Continuous integration is extremely useful when developing a project with multiple collaborators. Travis-CI platform offers an excellent service for github based projects. I wanted to create and example project and see what are the steps required for integrating github project with Travis-CI.

Overview

Here is an excellent summary of Continuous Integration from Marko Bonaci

Continuous Integration is the umbrella for various techniques and practices that every self-respecting software project should employ.The main goal is to eliminate the long and tedious integration process, the work that you normally have to do between version’s final development stage and its deployment in production. So you routinely perform (or rather, CI performs for you) the same sequence of steps, thus making the whole process polished and reliable.

The main features of Travis-CI agree

  1. Automatically detects when a commit has been made and pushed to a GitHub repository that is using Travis CI, and each time this happens,
  2. It will automatically try to build the project and run tests.
  3. Project management integration
  4. Project Dashboard -> everything is out in the open (generally without any read access restrictions, making it available to all interested parties)
  5. Supports a wide range of languages,

Integrating a GitHub project

If the project is GitHub the integration is very easy. Here are the basic steps I followed

  1. Sign in to Travis-CI using a GitHub id
  2. In the upper right corner click on your name (or choose Accounts) to open your Travis-ci profile. Then you will be able to see the GitHub repositories. The sync toggle-slider will enable
  3. Now in the GitHub local repo, create a .travis.yml file. You can see an example here. More documentation can be found here. If you have more then one language in the code you may have to be a bit creative and do something like this
  4. As soon as you push this to GitHub, you will see that the build is happening in your Travis-CI Dashboard.
language: cpp

compiler:
    - gcc

before_install:
    - echo $LANG

before_script: cmake CMakeLists.txt

script:
    - $CXX --version
    - make

You can even embed the build status in the README.md of your project. See the documentation here

Rust programming language

I hear a lot of good things about Rust programming language. It currently sits in the top 20 in popularity. I wanted to checkout the language features and I find it rather refreshing. However, as with any new language, Rust has some issues as well.

What is it all about?

There is a lot of talk about how Rust is superior to c/c++. Here is an example from Dzmitry Malyshau that shows “A lost pointer to the Local Variable”

#include <stdio.h>
int *bar(int *p) {
    return p;
}
int* foo(int n) {
    return bar(&n);
}
int main() {
    int *p1 = foo(1);
    int *p2 = foo(2);
    printf("%d, %d\n", *p1, *p2);
}

This will print

2, 2

How ever in Rust an equivalent code will result in a compilation error.

fn bar<'a>(p: &'a int) -> &'a int {
    return p;
}
fn foo(n: int) -> &int {
    bar(&n)
}
fn main() {
    let p1 = foo(1);
    let p2 = foo(2);
    println!("{}, {}", *p1, *p2);
}

While compiling you will see

demo:5:10: 5:11 error: `n` does not live long enough
demo:5 bar(&n)
^
demo:4:24: 6:2 note: reference must be valid for the anonymous lifetime #1 defined on the block at 4:23…
demo:4 fn foo(n: int) -> &int {
demo:5 bar(&n)
demo:6 }
demo:4:24: 6:2 note: ...but borrowed value is only valid for the block at 4:23
demo:4 fn foo(n: int) -> &int {
demo:5 bar(&n)
demo:6 }

I agree that the pointer is lost there, but do we really write a piece of code like that in C in real life? In my opinion unlikely.

In any case I have enjoyed programming in Rust. :) Here is my collection of examples.

In my previous post I wrote about my experience with writing a KDE code. One of the biggest challenges was to optimally select the points in space which are “relevant” to KDE given a random point. Of course one can select all points to the “best” estimate given the set of samples. However, this may be computationally expensive when the dimensionality of the problem is high and the number of samples are very large. In such situations on may need to choose the best points for KDE given a kernel. This can be achieved by choosing set of nearest neighbors for computing the KDE. Again I was exploring the github landscape for nearest neighbor algorithms.

Nearest Neighbors in github

There are plenty of codes in github that implements the nearest neighbors. Here is a small list

  1. https://github.com/mariusmuja/flann
  2. https://github.com/spotify/annoy
  3. https://github.com/aaalgo/kgraph

I found flann extremely light and easy to use. The only dependency in Eigen. An example from flann showing the API is here

#include <flann/flann.hpp>
#include <flann/io/hdf5.h>

#include <stdio.h>

using namespace flann;

int main(int argc, char** argv)
{
    int nn = 3;

    Matrix<float> dataset;
    Matrix<float> query;
    load_from_file(dataset, "dataset.hdf5","dataset");
    load_from_file(query, "dataset.hdf5","query");

    Matrix<int> indices(new int[query.rows*nn], query.rows, nn);
    Matrix<float> dists(new float[query.rows*nn], query.rows, nn);

    // construct an randomized kd-tree index using 4 kd-trees
    Index<L2<float> > index(dataset, flann::KDTreeIndexParams(4));
    index.buildIndex();

    // do a knn search, using 128 checks
    index.knnSearch(query, indices, dists, nn, flann::SearchParams(128));

    flann::save_to_file(indices,"result.hdf5","result");

    delete[] dataset.ptr();
    delete[] query.ptr();
    delete[] indices.ptr();
    delete[] dists.ptr();

    return 0;
}

Markov Chain Monte Carlo is an excellent tool for estimating posterior densities. The output of these algorithms are samples from the posterior probability distribution of parameters. One can easily obtain summary statistics from these samples, for example mean and standard deviation. However if the posterior distribution is used as an input to another Bayesian problem, we need a method of estimating the probability given a random sample from the posterior space. This is where the KDE is extremely useful.

Overview

In Python, R and MATLAB there are plenty of off-the-shelf libraries available for posteriors with reasonably large dimensions. However, it is hard to find a stable library in c, c++ and fortran. I was looking at github and found the following open source codes.

  1. https://github.com/timnugent/kernel-density
  2. https://github.com/KaiyuanWu/fastKernelDensityEstimation
  3. https://github.com/jmarshallnz/adsmooth.git
  4. https://github.com/vmorariu/figtree.git

Every one of these have interesting aspects but none of the matched the requirements of my problem. My requirements where

  1. a header only library
  2. can handle large dimensions
  3. fast
  4. efficient memory management

Since none of the codes satisfied all 4 requirements, I started my own version of it. You can find the code in GitHub. My idea is that the kernels can be specified as a template parameter. Then we can create an efficient library with many different kernels. A demo code is shown below

#include <KernelDensityEstimation>

template<typename realScalarType>
void GaussAllNbs(std::vector< std::vector<realScalarType> > const & dataIn)
{
    typedef kde::Gaussian<realScalarType> kernelType;
    typedef kde::DiagonalBandwidthMatrix<realScalarType> bandwidthType;
    typedef kde::AllNeighbours<realScalarType> neighboursType;
    typedef kde::KernelDensityEstimator<kernelType,bandwidthType,neighboursType> kdeType;
    typedef typename kdeType::realVectorType realVectorType;
    typedef typename kdeType::realMatrixType realMatrixType;
    typedef typename kdeType::indexType indexType;

    assert(dataIn[0].size() == 3);//will work for a 2-d pdf only!

    realMatrixType samples(dataIn.size()/4,dataIn[0].size()-1);

    for(size_t i = 0; i<dataIn.size()/4; ++i)
    {
        for(size_t j=0; j<dataIn[0].size()-1; ++j)
        {
            samples(i,j) = dataIn[i][j];
        }
    }

    // build kde
    kdeType kde(samples);

    // find the bounds of the 2-d pdf
    const realScalarType xMin = samples.col(0).minCoeff();
    const realScalarType xMax = samples.col(0).maxCoeff();
    const realScalarType yMin = samples.col(1).minCoeff();
    const realScalarType yMax = samples.col(1).maxCoeff();

    // create a plottable data
    const indexType numSteps = 100;
    const realScalarType dx = (xMax - xMin)/(realScalarType) numSteps;
    const realScalarType dy = (yMax - yMin)/(realScalarType) numSteps;

    std::ofstream outFile;
    outFile.open("plot-bi-variate-Gauss.dat",std::ios::trunc);
    outFile<<std::scientific;
    for(indexType i=0;i<numSteps;++i)
    {
        realScalarType xi = xMin + i*dx;
        for(indexType j=0;j<numSteps;++j)
        {
            realScalarType yi = yMin + j*dy;
            realVectorType samp(2);
            samp(0) = xi;
            samp(1) = yi;
            //outFile<<std::setprecision(10)<<xi<<","<<yi<<","<<kde.compute(samp)<<std::endl;
            outFile<<std::setprecision(10)<<xi<<","<<yi<<","<<kde.computePDF(samp)<<std::endl;
        }
        outFile<<std::endl;
    }
    outFile.close();

}

int main()
{
    typedef double realScalarType;
    std::string fileName("../data/bi-variate-Gauss.dat");
    std::vector< std::vector<realScalarType> > dataIn;
    utils::readData<realScalarType>(fileName,',',dataIn);

    GaussAllNbs<realScalarType>(dataIn);
}

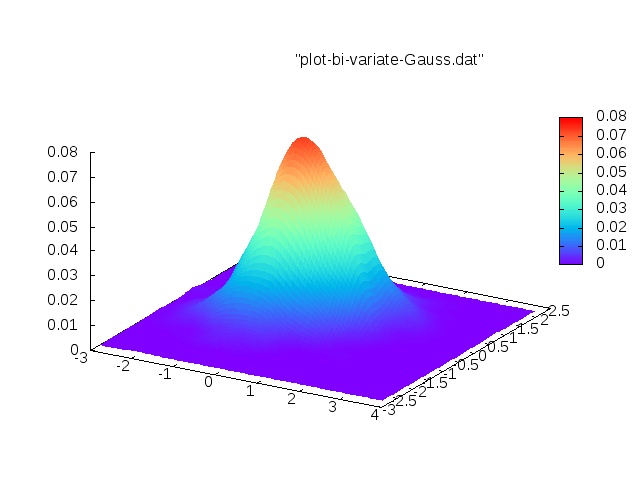
Here is an example of a 2-D density I recreated with my code

KDE

The linear algebra war is heating up! There are a handful of excellent linear algebra libraries with GPU backend and it exciting to see the different APIs and their capabilities.

Linear algebra libraries

First of all there are several excellent libraries for doing linear algebra in GPUs

  1. cuBlas
  2. clBlas
  3. Magma
  4. Vienna-CL

I haven’t seen a performance comparison of these libraries yet.

Other vector libraries

Some other important vector libraries are below

  1. BoostCompute
  2. Thrust
  3. Hsa-Bolt
  4. ArrayFire